

Team working agreements (sometimes called team norms) are all about how we are going to work together as a group of people. To do this effectively, we need fairly deep and honest conversations, and yet we see many working agreement sessions stay fairly superficial. The approach in this article uses LEGO® Serious Play® for the core discussions to get those more meaningful conversations.
Note that team working agreements are about the people. Agreements around the work itself is part of a policies discussion, and while some teams like to cover both at the same time, they really are two different discussions. What’s covered in this article is working agreements only, and not work policies.
You may notice many similarities between this and the LEGO retrospective we described in an earlier article and that’s not a surprise. LEGO Serious Play is the core of both and so there will be overlap between the two.
Plan to bring with you:
- Sticky notes and sharpies.
- LEGO kits (see below)
- A timer
General notes
- After the very first exercise, builds will always be either 3 or 4 minutes. Pick a time and stick with it. We don’t time the story telling but do encourage people to move quickly.
- I always book two hours for a session like this. We need time to get the meaningful conversations going and if we don’t have enough time, we simply won’t.
- Note that we’ve always done this exercise with all participants sitting around the same table. Could it be done remotely? We haven’t tried.
PART 1 : Skill Building
Part 1 is all about skill building. Getting the participants used to working with the materials and with the process we’ll be following.
1a) Build a bridge (2 min build):
Build a bridge from LEGO bricks. The point here is just to get people comfortable with the LEGO bricks. Many have not used LEGO since they were a kid, and we often find participants who have never used LEGO at all before. This first build is purely to get those skills working again and get people comfortable working with the bricks.
The only constraints we give for the build are that:
- Two fingers must be able to fit underneath the bridge.
- The model must include a mini-fig1.
At the end of the build, show your bridge to other people at your table and tell them what’s interesting about it.
1b) Build from instructions (3 min build):
Using this diagram, build a moose.
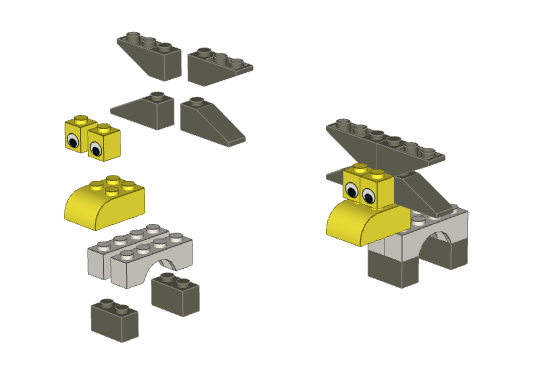
Show your neighbours. All the moose should be identical and if they aren’t then discuss why that might be.
Note that if you’re doing the same exercise for a group that’s already done it a few times and you feel that the moose had become too simple for them, try the snowmobile instead. That one is much harder though so be warned.
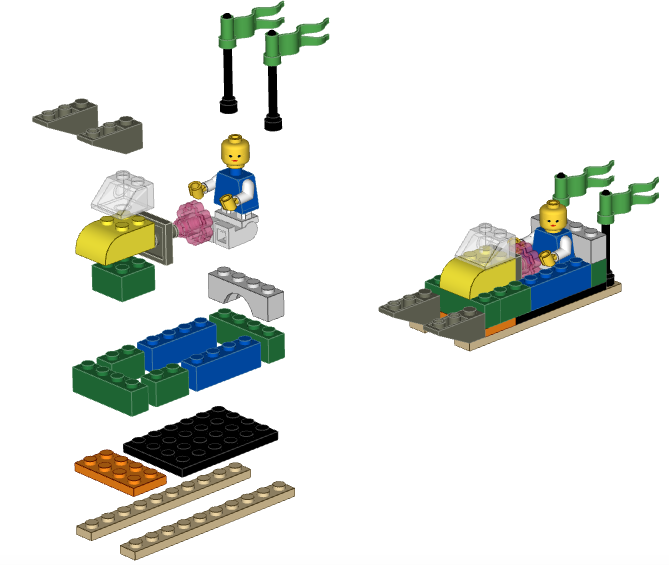
1c) Build to share a story (3 min build):
Building on your moose from the previous step, build something abstract. We often use a “nightmare project” as our example. You want a topic that evokes strong emotion and you also want to avoid anything that you’ll be touching on in the next section.
Tip: Sometimes a participant will be stuck and will just stare at the LEGO pieces in front of them. Encourage them to just start building something and the ideas will start to flow. “Your fingers know what to do.” This may sound somewhat magical but we’re tapping into the unconscious mind at this point and answers will come.
Each person now shares the story of their model with the others at their table. Encourage them to keep it brief, as some people will ramble.
It’s critical that everyone gets a chance to tell their story.
We want them talking only about the model and not about other things that might be on their mind. It’s ok to say “Does the red brick on top mean something?” but not ok to say “I had a similar experience….”
PART 2 : Working Agreement Builds
Now that we’ve demonstrated skill with the LEGO, Part 2 is where we get into the actual topic at hand.
We’re going to loop through part 2, three times in total (two here and a third in part 3) with different questions to elicit a complete picture of the team. We find that three is a reasonable number as it’s long enough to get some really good discussion and not so long that people start to get bored. Yes, people will get bored with LEGO if it goes on too long.
2a) Facilitator asks an open-ended question
You can use whatever questions you feel are appropriate. We often use two of these, and then another later in section 3.
- “Describe the best or worst team member ever.”
- “What’s the superpower you bring to this team?” In other words, what do you bring to the table that really adds value to the team.
- “What kind of help do I want from my team to be high-performing?” A strong team complements each other. This question is designed to find how we can do that.
- What kind of help do I want from my team to be high-performing?
- If I appear to you to be stressed or overwhelmed, I would like you to…
2b) Participants build (3 minutes)
In silence, participants build a model that represents their answer to the question. Ask them to not check their phones or talk to their neighbours, as this will interrupt the flow we’re trying to achieve.
Sometimes people will want to talk because they’re getting a little bored waiting for the timer to run out. That’s actually part of the process and we’re ok if it happens. Real insights or aha moments require a brain pause and we often don’t allow ourselves to have those pauses.
2c) Participants share their stories
Tell their story as in part 1. All the same rules apply as above.
2d) Capture the stories on a sticky note
As each person finishes telling their story, someone (doesn’t have to be the same person who spoke) will capture a few words on a sticky note to capture the essence of that story. If you’re concerned about time, it’s ok if the writing happens at the same time that the next person is starting to tell their story.
When all stories have been told, there will be as many sticky notes on the table as there were participants, for this round.
2e) Repeat
Repeat part 2 as often as needed to capture answers for a variety of questions. As mentioned above, we typically do three loops through but you can tailor that for your environment.
PART 3 : Conflict
How we deal with conflict is something that should absolutely be discussed as part of the working agreements and it’s a rare team that will bring it up on their own so we have a special section for that.
We ask everyone to hold up a LEGO brick, where the colour of that brick represents conflict for them. Once everyone has selected a brick, we go around the table and ask each person to explain why. We might get answers like:
- “Conflict is black because it’s dark and horrid”
- “Conflict is red because it makes me feel powerful”
- “Conflict is yellow because I shy away from it”
There are no wrong answers. What we’re trying to call out is that we all look at conflict slightly differently. If we all have similar answers then we can move on fairly quickly. If we have wildly disparate answers then we may want to spend some time talking through that.
Ellen had one team who had such wildly different views on conflict that they decided to create a safe word in cases where it was happening. That kind of a conversation would never have happened without a big of digging and could have escalated into something serious had it not been dealt with here.
Now that we understand how each of us thinking of conflict, go back and do another round of PART 2 with the question: “What should we do if we feel that one of us is letting the team down?”
PART 4 : Decide what will be in the working agreements
At this point, we should have one sticky note per question per person on the table. Give everyone a moment to review the stickies currently on the table. Cluster if it makes sense.
Then we ask “Based on what we’ve talked about, what behaviour should we include in our working agreement?” You can tackle this question as a final building round, or have a conversation to elicit specific items if clear themes have emerged.
As you’re working through those behaviours, remind the group to focus more on behaviours they need to work on, rather than ones they already do well. If they do it well, it probably doesn’t need to be explicitly documented.
Then dot-vote on all the possible items. You can vote on as many items as you want but a maximum of one dot per item. Any items that receive dots from everyone are automatically part of the working agreements because we all agree on them.
Any items that were voted on by the majority of people should be discussed and if agreed, should be added to the agreement.
Everything else is discarded. This doesn’t mean that those were bad ideas - they just weren’t agreed upon by the team and therefore don’t belong in a working “agreement”. We didn’t all agree.
You now have a completed working agreement. Someone will want to write it up somewhere that the team can access.
PART 4 : Done
- Ask everyone to separate all the LEGO bricks and put them back in the bags. This will make your life easier when you reorganize the bags.
Wrapping up
Getting LEGO kits
The easiest way is to purchase them from the LEGO Group, although unless you’re doing these activities regularly, this can be a very expensive proposition.
- Part 2000409: Window Exploration Bag This contains 500 of the smaller kits and is what most coaches use. With this, you can facilitate 500 people at once.
- Part 2000414: Starter Kit This is the larger kit and while it might look cheaper than the first one, be aware this this is only enough for one participant and the other kit has enough for 500 participants.
If you want to build your own kits from LEGO you may have around the house, you’ll want 50-60 pieces per person with certain specific pieces.
- At least one mini-figure1. If you only have one then also add something that could represent a second, like a piece with eyes. Mini-figures1 tend to be the most expensive pieces so only having one is ok.
- Something that moves (wheels, propeller etc)
- Something transparent
- Some random plates and bricks
Each kit should be as identical as possible so everyone is working with the same pieces
Packing it all up again
When you’re done, you’ll want to ensure that all the kits are properly stowed and that each bag contains exactly the right pieces. We use the Lean concept of poka-yoke for this. We print up a sheet containing an image of all the pieces and we place each piece on the paper until all the images are covered. When the sheet is full, you have one complete kit.
If you’re using the Windows Explorer Kits from LEGO then you can use our poka-yoke sheet.
Conclusion
This is a tremendously fun approach to creating working agreements that can get even the quietest group talking and brainstorming. It does take some effort to prepare and run it though.
Have some fun!